Today I paddled for 95 minutes.
When I got down to the dock there was a humongous snake sunning itself there. Snakes at our dock are nothing new, and I've mostly learned not to let them bother me. Some people are convinced they're water moccasins, but I've come around to the opinion that they're non-poisonous water snakes. I'm no snake expert, however, and I could be utterly wrong. In any case, I've never seen one behaving aggressively, and I just try to watch where I'm stepping and not catch one by surprise.
My intention was to paddle pretty easy today, ahead of a higher-intensity session tomorrow. I paddled out of the harbor and down toward the trio of old bridges south of downtown Memphis. When I got down there, I saw a towboat pushing a fuel barge upriver. I am quite familiar with this towboat, which is based just below the old bridges. It almost always produces a wake that is very good for surfing. So I headed up the Arkansas bank, pushing the pace so I could get ahead of the towboat and then paddle out to it. Yes, I know I was planning to paddle easy today, but, well...
"Training plan, schmaining plan," I thought. "I wanna go surfing!"
By the time I got up to the Hernando DeSoto Bridge, I was far enough ahead of the towboat that I could ferry out to the middle of the river in time to catch its wash. Ten or fifteen minutes of sweet surfing ensued.
Once the good waves had petered out, I headed back to the harbor and paddled easier for forty minutes or so before returning to the dock. I think I'll be fine for tomorrow.
Saturday, March 31, 2012

Thursday, March 29, 2012
Outfitting the tandem kayak, Part 5: Bulkheads continued

Here is the bow bulkhead after I have laminated it in a layer of fiberglass. The next step is to put the bulkheads in place, get them as "square" (perpendicular to the boat's long axis) as possible, and start glassing them in place. I start on one side of each bulkhead, attaching it to the inside of the boat with strips of fiberglass all the way around its edges. Then I move to the other side and fill the gaps between the plywood and the inner surface of the boat with epoxy resin thickened with wood dust to the consistency of putty. Finally, I lay strips of fiberglass around the edges of the bulkhead on that second side.

Here is the stern bulkhead after it has been glassed in on one side. I will fill the biggest gaps, like the one visible at the bottom of the photo, with thickened epoxy from the other side. Once that has hardened, I can do the fiberglass work on the other side.

This work involves positioning the boat one way, laying in some fiberglass and resin, letting it harden, and then positioning the boat another way. This way, I have gravity working for me at all times. Most of the time I'm able to work pretty comfortably, as in the photo at right, where I've got the boat suspended at such a height that I can stand up straight and work inside it.

However, there are a few moments when an uncomfortable working position can't be avoided. The hardest place to reach is the aft side of the bow bulkhead, because the bulkhead has to be placed up beyond the bow paddler's foot pegs. The photo at left shows me during what is probably the least pleasant part of this entire project.
At this point I should mention a property of epoxy resin that will be relevant throughout this project. Resin takes several days to become fully cured. After it has hardened but before it has fully cured, it is said to be "green." When fresh resin is applied to green resin, the two resins will form a chemical bond. But fully-cured resin will not bond chemically with fresh resin, and so it must be sanded so that a mechanical bond will be established between the new resin and the old. (Remember when we used to patch bicycle tires as kids, and we had to scuff up the area around the leak so the patch would stick?)
The resin in the original boat is of course fully cured. Therefore, I must sand the areas inside the boat where the bulkheads will be installed. Meanwhile, once I start the installation job, I want to get it completed before any of the new resin has fully cured so I don't have to do any more sanding.
March going out like a lamb
Today I did six laps of the March strength circuit and paddled for 150 minutes. Joe and I paddled up to the mouth of the Wolf, and then up the Wolf a couple of miles to a railroad bridge, before turning around and going back to the marina. The entire round trip, starting and finishing at our dock, is about 12 miles.
We've had some spectacular weather this week: warm, sunny, calm. And there are worse places to spend it than on the lower Wolf River. In its bottom few miles before it empties into the Mississippi River, the Wolf runs in its original meandering riverbed (it has been largely channelized farther upstream), and it's an exceptionally pretty place to paddle on a beautiful sunny day.
We've had some spectacular weather this week: warm, sunny, calm. And there are worse places to spend it than on the lower Wolf River. In its bottom few miles before it empties into the Mississippi River, the Wolf runs in its original meandering riverbed (it has been largely channelized farther upstream), and it's an exceptionally pretty place to paddle on a beautiful sunny day.
Tuesday, March 27, 2012
Outfitting the tandem kayak, Part 4: The bulkheads
Okay, enough small talk. Time to start doing some actual work.
Bulkheads are walls that seal off chambers in the bow and stern of a boat. They are a safety feature, as they prevent the boat from filling entirely with water in the event of a capsize. When combined with hatches in the deck, they allow for storage space for camping gear.
When installing the bulkheads, or doing any other work inside a boat, it's nice to have as much access to the inside as possible. So the next step for me is to go ahead and cut the holes for the hatches.
Here is the boat without hatches:

 Since I will be making my own hatch covers, the shape of the hatches is entirely up to me. I know I want the hatches to be as big as possible; I own a couple of large dry bags and on previous trips I have really had to cram them hard to get them stored in boats with smaller hatches. So I have designed the stern hatch good and big, while the bow hatch, though smaller, is still a good size for easy access. On a piece of paper, I drew a half-trapezoid, and then traced around margarine lids to round off the vertices. Then I used the pattern to trace the shape onto the deck of the boat, flipping it over so the hatch will be nice and symmetrical with respect to the boat's long axis. The bow hatch pattern is pictured at right.

Once the hatches were laid out, it was time to cut. It takes some real confidence in what you're doing to take an electric reciprocating saw to a beautiful boat.

And here is the boat after the hatch holes have been cut.
 Most of the bulkheads I have seen are made of minicell, but I was looking for a way to avoid the use of minicell here because it's hard to make a minicell bulkhead truly watertight. I called up Doug Bushnell, the man who made this boat, to ask for advice. He told me to use any piece of one-eighth-inch plywood, making sure it's well coated in epoxy to make it waterproof. Since I have no shortage of plywood scraps lying around, this was no problem. At left is the plywood for the stern hatch. I kept cutting and test-fitting until it fit the cross-section of the boat aft of the stern. My bandsaw was very helpful in this process; lacking a bandsaw, I would have used the reciprocating jigsaw and rasps.
 Mr. Bushnell pointed out that I did not want the plywood to fit snugly inside the boat, because it would wear a ridge onto the outside of the deck and hull. I'm very glad he told me that, because I would have driven myself crazy trying to create a perfect fit. Here is the plywood in place, with some gaps visible. The gaps will be filled in with thickened epoxy.

Here is the plywood for the bow bulkhead, also with gaps in places.
I'll tell you some more in my next post.
Bulkheads are walls that seal off chambers in the bow and stern of a boat. They are a safety feature, as they prevent the boat from filling entirely with water in the event of a capsize. When combined with hatches in the deck, they allow for storage space for camping gear.
When installing the bulkheads, or doing any other work inside a boat, it's nice to have as much access to the inside as possible. So the next step for me is to go ahead and cut the holes for the hatches.
Here is the boat without hatches:


Once the hatches were laid out, it was time to cut. It takes some real confidence in what you're doing to take an electric reciprocating saw to a beautiful boat.

And here is the boat after the hatch holes have been cut.


Here is the plywood for the bow bulkhead, also with gaps in places.
I'll tell you some more in my next post.
Pleasant paddling
Today I did six laps of the March strength circuit and paddled for 115 minutes. The weather was gorgeous, and I was paddling with my friend Joe, so there was no reason not to get a couple of extra miles in.
Monday, March 26, 2012
Monday Photo Feature

This past weekend the Brooks Museum of Art here in Memphis showed several films by the late Canadian naturalist, canoeist, artist, and filmmaker Bill Mason. The scenes of tandem canoeists playing in whitewater reminded me of the canoeing I did at summer camp in North Carolina in the 1980s. Above, Donnie Kohler and I peel out below Bull Sluice on the Chattooga River near Clayton, Georgia. Photo by Todd Tyler.
Sunday, March 25, 2012
Outfitting the tandem kayak, Part 3: The boat and the guy who's working on it

As I prepare to work with these fiber-reinforced plastics, the question comes up: how does somebody become an FRP expert?
I can't really tell you, because I am not that guy.
But over the years, I have learned a thing or two. My education began in earnest when I started to enter whitewater slalom races, and got my first FRP race boat. If you race on whitewater, you WILL break your boat sooner or later, so learning to patch it is a must. The first time I had to patch a boat, I bought some resin and fiberglass mat down at the auto parts store. The resulting patch was acceptable, but as time went on and I got to see how other racers were patching their boats, I picked up a few tricks of the trade, learning how to make patches neater, smoother, and more permanent, and also learning about better resin to use. (Newcomers to this blog can read a post here about a patching job I did earlier this month.)
In late 1994 I got a bee in my bonnet to convert a playboat kayak into a C-1. For some reason I chose the Lazer kayak, manufactured by the Wave Sport company of Steamboat Springs, Colorado, for this project (it turned out to be a terrible choice, but that's another story). I spoke on the phone with Chan Zwanzig, the owner of Wave Sport at the time, and he told me that because the kayak seat assembly in the Lazer is an important part of the boat's structural integrity, I would have to replace it with a Kevlar and fiberglass layup in the cockpit area. I was a little intimidated, but he kindly coached me through the process, and he pointed me toward Sweet Composites, my most important source of materials ever since.

Here's a picture of the Kevlar-and-fiberglass layup I made inside that boat. It's not the prettiest thing, but it held up fine and served as a solid anchor surface for the pedestal, thigh straps, and everything else a C-1 needs. (I took this photo while I was in the process of converting the boat back into a kayak recently. I have removed the pedestal and thigh straps.)
Over the next decade I started up a woodworking business, and found frequent uses for epoxy resin in my wood projects. Epoxy works not only as a glue, but also as a filler, so it's a good choice for securing a loose joint. And many of the tools and skills I use for woodworking cross over into FRP work.
I received another great learning experience several years ago when I built a Coho kayak, offered in kit form by the Pygmy company of Port Townsend, Washington. A lady here in town had bought a Coho kit, realized she was in over her head, and was seeking a builder. Somebody gave her my name, and there I was. Though I had never built a boat before, the kit came with easy-to-follow instructions, and I combined that with my FRP experience to get the job done. Pygmy boats are "stitch and glue" construction: the parts are all pre-cut to fit together precisely, and the builder simply "sews" them together with steel wire, injects resin into the seams with a syringe, removes the wires, and laminates the whole thing with a layer of fiberglass cloth saturated in resin. The project included bulkheads and hatches, so I will be drawing directly on that experience to outfit our Seafarer tandem kayak.
And this Seafarer project will be my latest independent study in the college of fiber-reinforced plastics. Whether I ever accumulate enough credits to earn the degree of master boatbuilder remains to be seen; but anytime I come away from an experience with new skills, that experience has been well worth the effort. This project includes a couple of things I've never tried before, but I figure I'm a smart enough guy to figure it out, and I hope I might inspire similar confidence in somebody who reads this.
Training volume considerations
Today I did six laps of the March strength circuit and paddled my boat for 100 minutes.
I recently revisited this article addressing the question of how much training one should do. My favorite line is this: "Training does not make you better or faster. It's the RECOVERY from training that brings improvement."
I knew rest was important before I read this article, but seeing the idea put in those words prompted me to take it more seriously. These days I try to make sure that my rest days are as restful as possible. For example, I schedule my strength workouts on the same days that I schedule hard workouts in the boat (which I'll be starting up very soon) so that the "off" days will be totally off. I'm also thinking more about the role nutrition plays in recovery.
I recently revisited this article addressing the question of how much training one should do. My favorite line is this: "Training does not make you better or faster. It's the RECOVERY from training that brings improvement."
I knew rest was important before I read this article, but seeing the idea put in those words prompted me to take it more seriously. These days I try to make sure that my rest days are as restful as possible. For example, I schedule my strength workouts on the same days that I schedule hard workouts in the boat (which I'll be starting up very soon) so that the "off" days will be totally off. I'm also thinking more about the role nutrition plays in recovery.
Saturday, March 24, 2012
Dodging the wind
Today I paddled around the Loosahatchie Bar again, and it took me 140 minutes. Two weeks ago I paddled this course counter-clockwise, but today I opted for clockwise. An annoying beam wind was blowing from the west, and paddling up along the forested Arkansas bank afforded me some shelter from that.
It was cool but sunny, and the wildlife was out. I saw many ducks and turtles, a few jumping fish, and a great blue heron.
It was cool but sunny, and the wildlife was out. I saw many ducks and turtles, a few jumping fish, and a great blue heron.
Thursday, March 22, 2012
Symmetry
Today I did five laps of the March strength circuit and paddled for 100 minutes.
As I continue to work on my stroke, I realize that the strokes on my right are not the same as the strokes on my left. That's probably not uncommon; most people are either right-handed or left-handed, after all. And when I raced slalom I competed in the single canoe class, paddling on the left, and I wouldn't be surprised if that's related. Anyway, I'd like my strokes to be effective on both sides of the boat even if they're not mirror-images of each other. Something to work on.
As I continue to work on my stroke, I realize that the strokes on my right are not the same as the strokes on my left. That's probably not uncommon; most people are either right-handed or left-handed, after all. And when I raced slalom I competed in the single canoe class, paddling on the left, and I wouldn't be surprised if that's related. Anyway, I'd like my strokes to be effective on both sides of the boat even if they're not mirror-images of each other. Something to work on.
Wednesday, March 21, 2012
Outfitting the tandem kayak, Part 2: Workspace and tools
When it's time to do some work on your boat, putting some thought into your work space can make the difference between a satisfying experience and a miserable one.
I'm probably more fortunate than many paddlers, because my woodworking shop converts fairly easily to a boatworking shop. My workshop is an amenity that I, in the grand American tradition, married into. Martha's house had a three-car garage out back that she wasn't doing much with other than storing the sort of old junk that every homeowner accumulates. When I moved in with Martha, I cleaned the place out, did some renovation work, and set up shop.
 I screwed some eye-bolts into the ceiling joists and tied ropes to them. Most of the time I keep the ropes tied up out of the way, but when it's boatworkin' time, down they come. I've got the ropes rigged so I can easily adjust the height of the boat: sometimes I want the boat at shoulder height so I can turn it upside-down and work up inside the cockpits; sometimes I want it at waist-height so I can work on the outside of it; sometimes I want the bow higher than the stern, or vice-versa, so I can use gravity to make the resin flow where I want it to.
If you don't have a good workshop space for working on your boat, look for other places where you can suspend ropes: a porch, an arbor, the eaves right next to a house, even a tree branch. Because rain, wind, and windblown dust are not your friends, a sheltered place is desirable; an indoor space is even better, especially in the wintertime. The general rule of thumb, as I've always understood it, is that the temperature must be warmer than 60 degrees Fahrenheit for resin to cure properly. (A chemist would know how to formulate the resin to cure over a larger range of temperatures and pressures, but since I last studied chemistry 26 years ago as a high school senior, I lack such expertise.) The only heat source in my shop is the wood stove that's visible in the lower-left of the photo, so if it's cold outside I'll fire it up and get the place good and toasty, and the building's insulation keeps the place adequately warm for at least 24 hours or so. This year we had a mild winter and it's been an exceptionally warm March, so the temperature hasn't been an issue for this project so far.
Now... on to tools. Different people seem to prefer different implements for applying the resin: brushes, spatulas, foam pads... browse your local hardware store and you'll see all kinds of things that could work. Sweet Composites has a selection of applicators for sale as well.
 I like to use a piece of minicell, using it like a squeegee. In three decades of paddling and outfitting boats, I've accumulated a near-endless supply of scraps. The beer box pictured at left holds merely the smallest of my scraps; I've got several big boxes of larger scraps up on a high shelf in the shop. For best results, I try to cut a nice clean piece without little shreds of foam hanging off it that can come off into the resin. A bandsaw is the best tool for doing this (see below), but hack saws and mat knives work pretty well.
 An electric drill is often useful for work on a boat. You can bore holes with it (obviously) and you can attach a sanding disc and do some aggressive sanding. Another electric tool I'll be using in this project is a jigsaw.
 Some sort of wastebasket is a good thing to have. These fabrics, especially fiberglass, have loose fibers that stick all over everything once they're wetted out with resin. Wherever I'm working, I try to have the wastebasket within reach so I can scrape these sticky fibers off my hands onto the inside of the bag.
 Get yourself some latex gloves. Resin is not pleasant stuff to get all over your hands. It's been linked to all kinds of dermatitis-like ailments. Some people are more sensitive to it than others, but since resin is also a real pain to wash off, it just makes sense to wear gloves.
 A respirator or dust mask is an important piece of equipment whenever you're sanding any part of a boat. A respirator is not really that expensive and is worth getting if you plan to do a lot of this kind of work (you replace the cartridges once in a while). If you opt for the less expensive dust mask, be sure to get a better-quality one with an exhale valve like the one in the picture has.
 A syringe is a useful tool for getting resin into tight, hard-to-reach spaces. I think I bought the one with the long pointy tip from Sweet Composites many years ago (I've still got a little packet of them). I've accumulated many others over years of taking sick pets to the vet and coming home with medicines to be administered by syringe. If you're starting to think I'm some kind of packrat, you're catching on fast.
 Resin is messy, messy stuff, and it has a way of getting on just about everything. Acetone is the best solvent for cleaning up wet resin. You can buy it in any hardware or auto parts store. An eco-friendly alternative is white vinegar, available in any grocery store. I've used acetone for years because for a long time I thought it was the only solvent that would clean up wet resin, but I'm starting to use white vinegar more and more, especially for cleaning resin off my skin.
 Because I am a woodworker by profession, I own a bandsaw, and occasionally it is quite handy when you're working on a boat, too. But it is a luxury item--please do not go out and buy one because you think you can't work on your boat without one. You can. In fact, the other day I spoke on the phone with Doug Bushnell, the man who built the boat I'm getting ready to work on, and he told me the only power-driven tools he owns are a jigsaw and a drill. And he's a full-time, professional boatbuilder.
Having said that, I have to admit that my bandsaw makes quick work of jobs that can otherwise be a little tedious. And it has no equal when it comes to cutting minicell.

Finally, if you're doing work inside a boat like I'll be doing here, a headlamp is a very nice thing to have. Thank you, miners and cavers, for giving the world this simple but incredibly useful piece of equipment.

And here I am getting started on the bulkhead phase of this project. The boat is at a comfortable work height. The gloves are on. The wastebasket is at my feet. And I'm probably wearing the headlamp.
I'm probably more fortunate than many paddlers, because my woodworking shop converts fairly easily to a boatworking shop. My workshop is an amenity that I, in the grand American tradition, married into. Martha's house had a three-car garage out back that she wasn't doing much with other than storing the sort of old junk that every homeowner accumulates. When I moved in with Martha, I cleaned the place out, did some renovation work, and set up shop.

If you don't have a good workshop space for working on your boat, look for other places where you can suspend ropes: a porch, an arbor, the eaves right next to a house, even a tree branch. Because rain, wind, and windblown dust are not your friends, a sheltered place is desirable; an indoor space is even better, especially in the wintertime. The general rule of thumb, as I've always understood it, is that the temperature must be warmer than 60 degrees Fahrenheit for resin to cure properly. (A chemist would know how to formulate the resin to cure over a larger range of temperatures and pressures, but since I last studied chemistry 26 years ago as a high school senior, I lack such expertise.) The only heat source in my shop is the wood stove that's visible in the lower-left of the photo, so if it's cold outside I'll fire it up and get the place good and toasty, and the building's insulation keeps the place adequately warm for at least 24 hours or so. This year we had a mild winter and it's been an exceptionally warm March, so the temperature hasn't been an issue for this project so far.
Now... on to tools. Different people seem to prefer different implements for applying the resin: brushes, spatulas, foam pads... browse your local hardware store and you'll see all kinds of things that could work. Sweet Composites has a selection of applicators for sale as well.


Having said that, I have to admit that my bandsaw makes quick work of jobs that can otherwise be a little tedious. And it has no equal when it comes to cutting minicell.

Finally, if you're doing work inside a boat like I'll be doing here, a headlamp is a very nice thing to have. Thank you, miners and cavers, for giving the world this simple but incredibly useful piece of equipment.

And here I am getting started on the bulkhead phase of this project. The boat is at a comfortable work height. The gloves are on. The wastebasket is at my feet. And I'm probably wearing the headlamp.
Tuesday, March 20, 2012
Outfitting the tandem kayak, Part 1: The Materials
I. Resin
 The resin I use is pictured at left. Resin is simply a plastic in liquid form. When the two parts are combined, it hardens into a solid in an hour or so, and cures to its full strength over the next one to three days. The pumps on the two cans (sold separately) are calibrated to dispense the resin and hardener in the correct ratio. I mix the two parts in a plastic party cup like the red one in the photo.
The resin pictured is epoxy resin, generally the best thing for building boats and other marine-related objects. There are other types of resin, such as polyester and vinylester, that I understand are fine for building accessories like the bulkheads and hatches and stuff that I'll be building in this project, and they generally cost less than epoxy resin. But at this time I have no experience with them, and I'm sticking to what I know. One day I'll get around to trying those other resins out.
Whatever type of resin you use, take this advice: spend a little extra and get the good stuff. If you use the stuff they sell down at the auto parts store, you WILL be disappointed. The Gougeon Brothers West System brand pictured is about as good as you can get for marine applications. I've also used the System Three brand, on a project I did several years ago, and it seemed fine as well.
So, where do you go to get good resin? I buy my resin (and numerous other things, as I'll explain later) from a mail-order supplier called Sweet Composites. John Sweet, one of the best whitewater racers in the U.S. back in the 1960s and 70s, founded Sweet Composites to provide boatbuilding materials for his fellow paddlers (back then, in the days before Perception Kayaks and other manufacturers, the best way to get a good boat was to make your own). When Sweet retired a few years ago, he sold the company to Jennifer Hearn and her husband Davey, a world champion and three-time Olympian in whitewater slalom, and they now run it out of their home in Bethesda, Maryland.
There are other places to get good-quality resin; the West Marine chain of stores is probably the best-known. I have not compared prices to see where I can get the best deal; personally, I prefer mom-and-pop companies over large national chains even if I have to pay a few more dollars. Since Sweet Composites is operated by paddlers, for paddlers, they're a cinch to get my business.
 Sometimes it is desirable to add a thickener to your resin to increase
its viscosity. Unthickened resin has the consistency of thin maple syrup; you can thicken it into a putty thicker than peanut butter. Happily for me, one of the most common thickeners is a
by-product of my woodworking business: wood dust. I keep a jar (pictured at right) full of the dust from
my belt sander and random orbital sander and keep it handy
for resin-thickening purposes. The downside of wood dust is that it turns the resin a chocolate-brown color, which could be a cosmetic problem. I only use it on the inside of a boat, or in non-visible woodworking applications. Sweet Composites sells a variety of thickeners for a variety of situations.
Sometimes it is desirable to add a thickener to your resin to increase
its viscosity. Unthickened resin has the consistency of thin maple syrup; you can thicken it into a putty thicker than peanut butter. Happily for me, one of the most common thickeners is a
by-product of my woodworking business: wood dust. I keep a jar (pictured at right) full of the dust from
my belt sander and random orbital sander and keep it handy
for resin-thickening purposes. The downside of wood dust is that it turns the resin a chocolate-brown color, which could be a cosmetic problem. I only use it on the inside of a boat, or in non-visible woodworking applications. Sweet Composites sells a variety of thickeners for a variety of situations.
II. Cloth
Race boats and other high-performance canoes and kayaks are made of cloth. The cloth is saturated with resin and laid into a boat-shaped mold, and after the resin cures, it all comes out of the mold, and it's a boat! That's the very basic explanation, anyway.
 There are different kinds of cloth, each having desirable properties that the others lack. Therefore, most boats contain layers of two or more of them (that's why such boats are often called "composite" boats). The photo at left shows the two types of cloth I use the most. The white cloth is basic fiberglass, sometimes called e-glass or s-glass depending on its weave and strength. The gold cloth is Kevlar, developed and trademarked by the DuPont company.
What's pictured here are assorted scraps of cloth that I keep in Rubbermaid containers to protect them from dust and moisture. In the little white sleeve with "KEVLAR" written across the top is a pair of scissors that I keep with the Kevlar and use ONLY for cutting Kevlar (Kevlar is difficult to cut with anything other than very sharp scissors, and using a pair of scissors to cut fiberglass quickly ruins it for cutting Kevlar).
 When I buy cloth, I sometimes buy part or all of a large roll like those pictured at right. Sweet Composites sells fabrics in rolls or by the yard from said rolls. If I don't need such a large quantity--if I need just enough to patch a boat, for instance--I can buy small bolts of it here in Memphis at Outdoors, Inc., our local outdoor sports retailer that I'm happy to support because it's owned by Memphians, one of whom is my good friend and training partner Joe Royer. Fiberglass of various qualities and grades can also be bought in hardware stores and auto parts stores. One disadvantage to buying cloth in some way other than from a roll is that it will typically be folded up into a plastic package, and as a result will have creases in it.
(By the way, the black fabric on the left in this photo is graphite (carbon) fiber, which I use only very occasionally. Martha's boat has a carbon-fiber deck, and if it gets cracked I'll patch it with a piece of carbon fiber along with some fiberglass. I also use the carbon fiber if I have to repair one of my carbon-fiber paddles. In any case, this roll should last me a good long while, as long as I keep it carefully stored.)
 These cloths also come in tape form, pictured at left. The most common use is for the seams where a boat's hull meets its deck.
The Sweet Composites website has more information on all the different kinds of cloth and the pros and cons of each. Go there if you want more information than I'm providing here.
Whew... I feel like I'm writing a book here. Hopefully future posts on this project won't be so long once I get this background information out of the way.
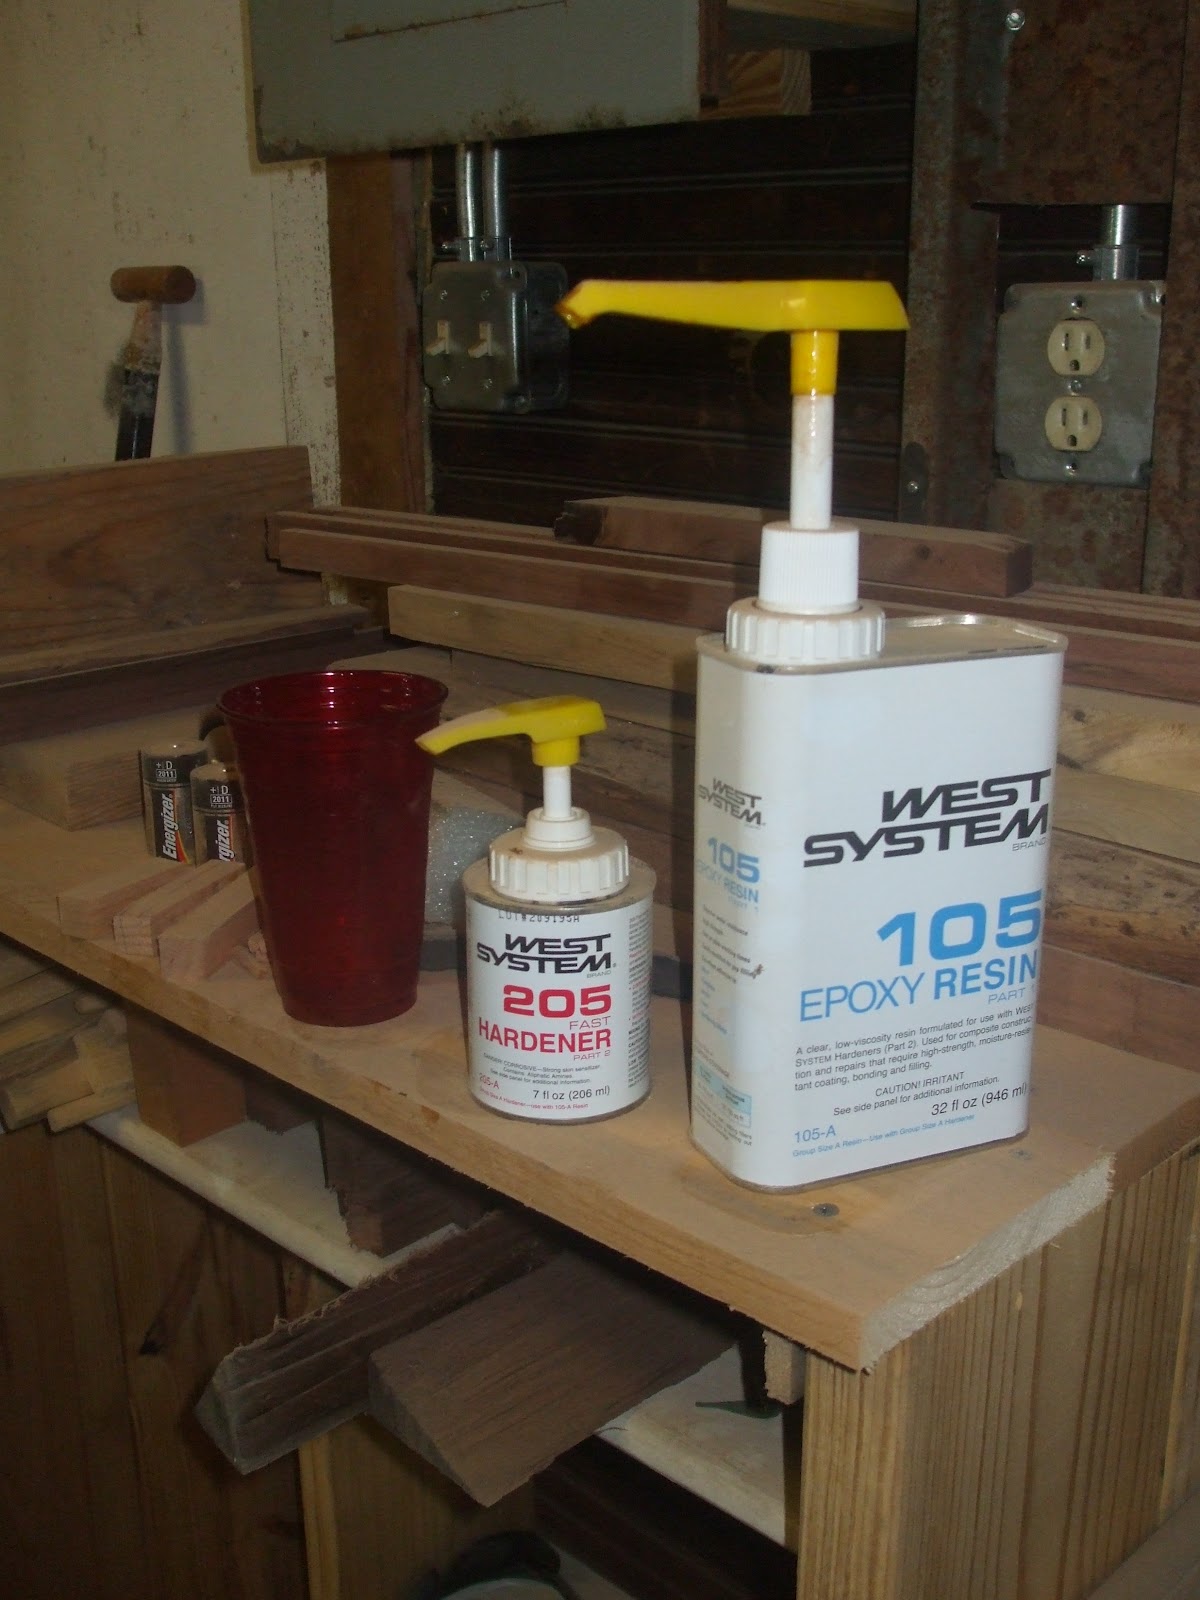
The resin pictured is epoxy resin, generally the best thing for building boats and other marine-related objects. There are other types of resin, such as polyester and vinylester, that I understand are fine for building accessories like the bulkheads and hatches and stuff that I'll be building in this project, and they generally cost less than epoxy resin. But at this time I have no experience with them, and I'm sticking to what I know. One day I'll get around to trying those other resins out.
Whatever type of resin you use, take this advice: spend a little extra and get the good stuff. If you use the stuff they sell down at the auto parts store, you WILL be disappointed. The Gougeon Brothers West System brand pictured is about as good as you can get for marine applications. I've also used the System Three brand, on a project I did several years ago, and it seemed fine as well.
So, where do you go to get good resin? I buy my resin (and numerous other things, as I'll explain later) from a mail-order supplier called Sweet Composites. John Sweet, one of the best whitewater racers in the U.S. back in the 1960s and 70s, founded Sweet Composites to provide boatbuilding materials for his fellow paddlers (back then, in the days before Perception Kayaks and other manufacturers, the best way to get a good boat was to make your own). When Sweet retired a few years ago, he sold the company to Jennifer Hearn and her husband Davey, a world champion and three-time Olympian in whitewater slalom, and they now run it out of their home in Bethesda, Maryland.
There are other places to get good-quality resin; the West Marine chain of stores is probably the best-known. I have not compared prices to see where I can get the best deal; personally, I prefer mom-and-pop companies over large national chains even if I have to pay a few more dollars. Since Sweet Composites is operated by paddlers, for paddlers, they're a cinch to get my business.

II. Cloth
Race boats and other high-performance canoes and kayaks are made of cloth. The cloth is saturated with resin and laid into a boat-shaped mold, and after the resin cures, it all comes out of the mold, and it's a boat! That's the very basic explanation, anyway.

What's pictured here are assorted scraps of cloth that I keep in Rubbermaid containers to protect them from dust and moisture. In the little white sleeve with "KEVLAR" written across the top is a pair of scissors that I keep with the Kevlar and use ONLY for cutting Kevlar (Kevlar is difficult to cut with anything other than very sharp scissors, and using a pair of scissors to cut fiberglass quickly ruins it for cutting Kevlar).
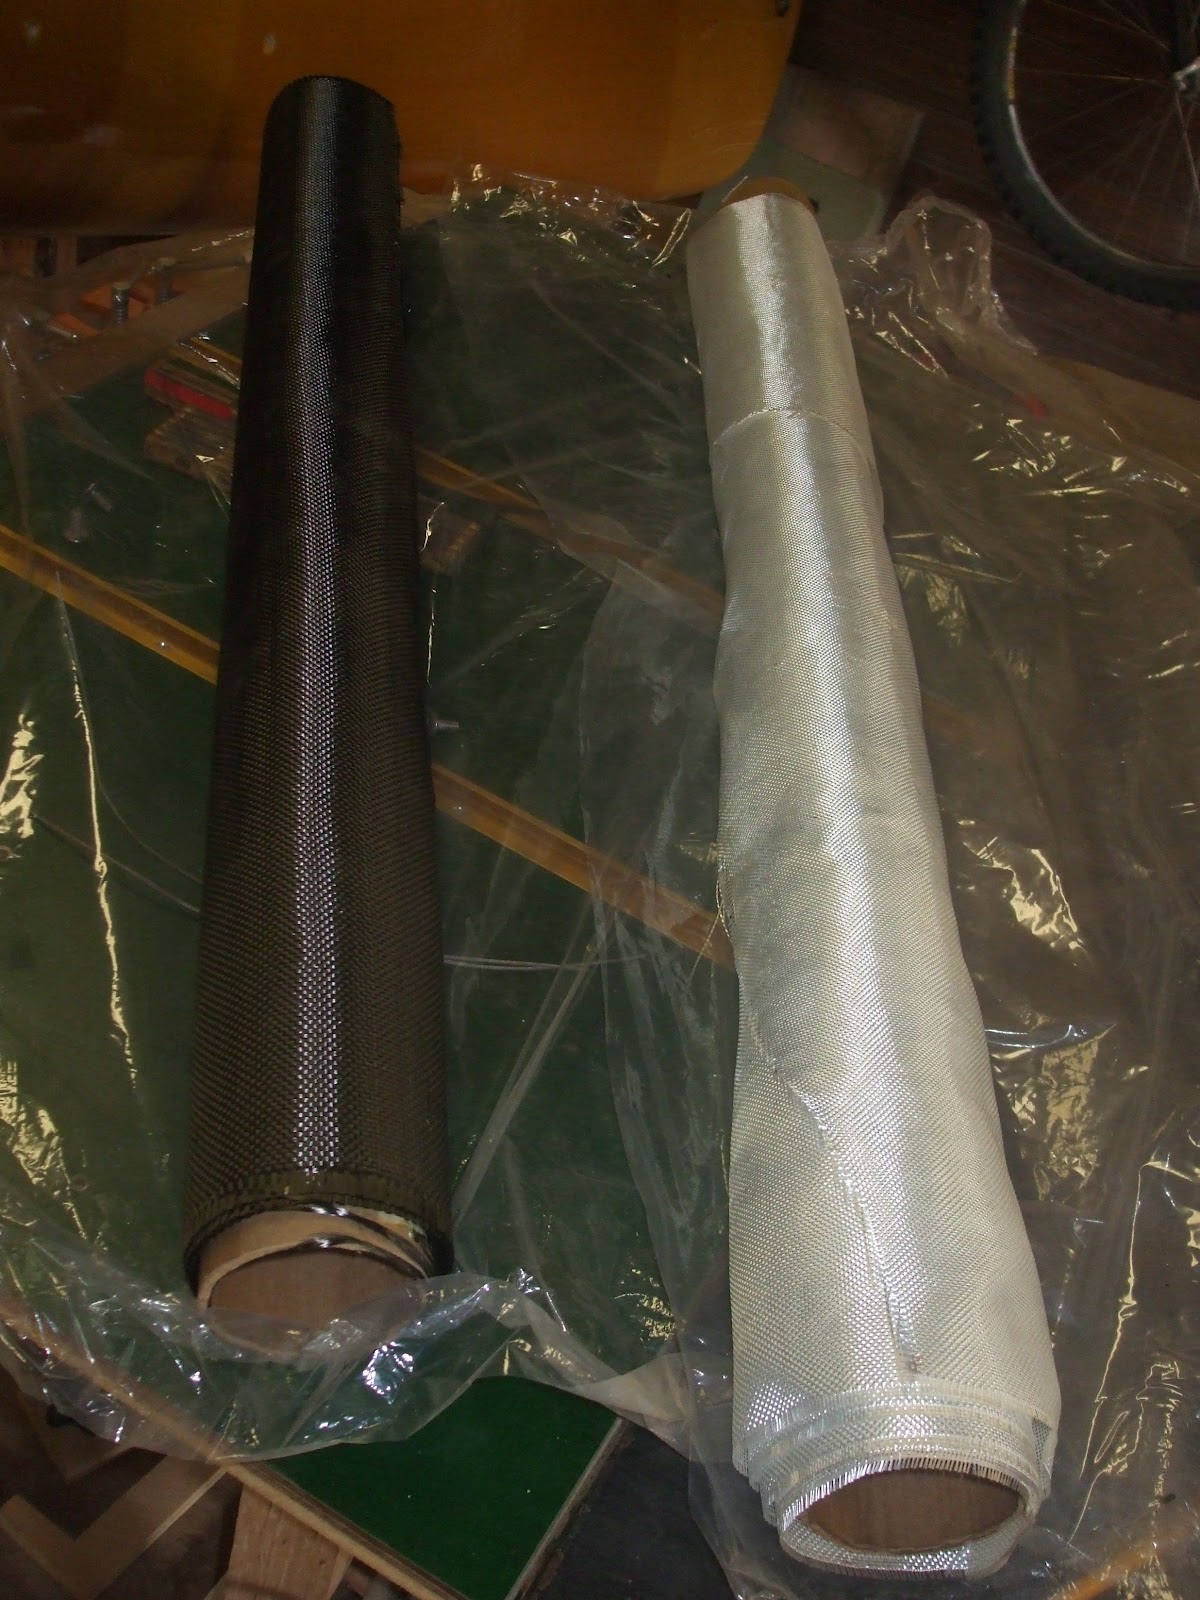
(By the way, the black fabric on the left in this photo is graphite (carbon) fiber, which I use only very occasionally. Martha's boat has a carbon-fiber deck, and if it gets cracked I'll patch it with a piece of carbon fiber along with some fiberglass. I also use the carbon fiber if I have to repair one of my carbon-fiber paddles. In any case, this roll should last me a good long while, as long as I keep it carefully stored.)
 These cloths also come in tape form, pictured at left. The most common use is for the seams where a boat's hull meets its deck.
The Sweet Composites website has more information on all the different kinds of cloth and the pros and cons of each. Go there if you want more information than I'm providing here.
Whew... I feel like I'm writing a book here. Hopefully future posts on this project won't be so long once I get this background information out of the way.
Happy equinox
Today I did five laps of the March strength circuit and paddled for 100 minutes. It was quite breezy this morning. Weather reports call for gusts up to 45 mph this afternoon, so I'm glad I paddled when I did.
Monday, March 19, 2012
Off schedule
Today I paddled for 100 minutes. I continued to work on my blade submersion, and felt a little more comfortable with it today.
Because of a variety of unusual events in the last few days, I've been off my usual Sunday-Tuesday-Thursday-Saturday schedule. The result is that I sort of feel like I've missed a lot of training even though in fact I haven't missed any at all--I even got my strength sessions in on their regularly scheduled days Thursday and Sunday. As a routine-driven sort of guy who's also probably a little obsessive, I'm feeling a bit out of whack. But I think the outside events have settled down and I should be back on track the rest of this week.
Because of a variety of unusual events in the last few days, I've been off my usual Sunday-Tuesday-Thursday-Saturday schedule. The result is that I sort of feel like I've missed a lot of training even though in fact I haven't missed any at all--I even got my strength sessions in on their regularly scheduled days Thursday and Sunday. As a routine-driven sort of guy who's also probably a little obsessive, I'm feeling a bit out of whack. But I think the outside events have settled down and I should be back on track the rest of this week.
Monday Photo Feature

The boat lacks bulkheads, meaning that the entire vessel will fill with water in the event of a flip. The absence of bulkheads also means no hatches for storing camping gear for a longer trip. And the seats are uncomfortable.
I've reached a lull in my woodwork, so I'm spending some time jazzing up the tandem boat. I'm going to install bulkheads and hatches and do something about the seats. Because I think every canoe and kayak racer should have at least a basic working knowledge of fiber-reinforced plastics, I plan to share my project here in both words and pictures over the next few days.
By no means am I a master boatbuilder myself; my 30-plus-year paddling career has been a hodgepodge of learning-by-doing experiences. The project before me involves a couple of things I've never tried before. I'll share it all here so that others might learn this stuff a little faster than I have. And if anybody knows of a way to do something that's better than the way I do it during the course of this project, I invite him or her to share it in the Comments section so that we may all learn something.
Saturday, March 17, 2012
Blade in the water
The other day I saw some video footage of my finish at Ocean Springs two weeks ago. I noticed I wasn't getting my paddle blades fully submerged on my strokes. Granted, I was worn out from racing for an hour and a half and probably couldn't be expected to take flawless strokes at that point, but it bothered me anyway. So today, as I paddled for 130 minutes on the Mississippi and Wolf Rivers, I worked on this one aspect of my stroke, making sure I inserted the blade completely into the water every time.
Concentrating on one little thing like that is exhausting. As I try to get the blade down in the water, I have to make sure I don't bob the boat by lunging forward and downward too hard, or slump my body too much in an effort to get a little closer to the water. And for me at least, there's a feeling in the back of my mind that while I may be doing that one thing perfectly, the rest of my stroke and my boat control are falling apart. The result is that I feel like I've altogether forgotten how to paddle, and I feel all frustrated by the time I get back to the dock.
One thing I probably need to do is get someone to take some video of me paddling on a regular basis to see if I really need the sort of work I put myself through today.
Concentrating on one little thing like that is exhausting. As I try to get the blade down in the water, I have to make sure I don't bob the boat by lunging forward and downward too hard, or slump my body too much in an effort to get a little closer to the water. And for me at least, there's a feeling in the back of my mind that while I may be doing that one thing perfectly, the rest of my stroke and my boat control are falling apart. The result is that I feel like I've altogether forgotten how to paddle, and I feel all frustrated by the time I get back to the dock.
One thing I probably need to do is get someone to take some video of me paddling on a regular basis to see if I really need the sort of work I put myself through today.
Wednesday, March 14, 2012
Too warm too soon
Today I paddled my boat for 100 minutes. These days I'm on a Sunday-Tuesday-Thursday-Saturday training schedule, but as I have a dentist appointment tomorrow morning and another doctor appointment after lunch, I decided to go to the river today rather than try to squeeze it in tomorrow.
I haven't yet heard today's high temperature, but it's freakishly warm--in the 80s, no question. I felt pretty hot while doing some work outside this afternoon. I'm not terribly sorry we had a mild winter, but I sure hope we have some bona-fide spring weather before the summer dog days get here.
One thing about a warm sunny day is it brings out the turtles and snakes out on the river. I saw one snake and a whole bunch of turtles today. I really enjoy the turtles: they sit on floating logs and sun themselves, sometimes a dozen of them lined up on one log. When they see me coming, they file off into the water, creating a series of "ploop, ploop, ploop" sounds. I've always thought that's kind of cute.
I haven't yet heard today's high temperature, but it's freakishly warm--in the 80s, no question. I felt pretty hot while doing some work outside this afternoon. I'm not terribly sorry we had a mild winter, but I sure hope we have some bona-fide spring weather before the summer dog days get here.
One thing about a warm sunny day is it brings out the turtles and snakes out on the river. I saw one snake and a whole bunch of turtles today. I really enjoy the turtles: they sit on floating logs and sun themselves, sometimes a dozen of them lined up on one log. When they see me coming, they file off into the water, creating a series of "ploop, ploop, ploop" sounds. I've always thought that's kind of cute.
Tuesday, March 13, 2012
Learn to love where you live
Today I did four laps of the March strength circuit and paddled my boat for 100 minutes.
There's really not that much I can tell you about these paddling sessions this time of year. I'm out there just paddling along, practicing my strokes and balance, trying to put as many miles under my boat as I can. It's all part of building the aerobic system, as I discussed in earlier posts.
At times it can seem like a grind, as though I'm just putting in the time because I have to more than because I want to. But most of the time that's not how it is. These paddles are the time I get to see the most beautiful scenes that the Mississippi River environment has to offer. After all, one of the main reasons we do this sport is to get outside and enjoy beautiful places.
Whenever some glossy travel or outdoor magazine publishes its list of the top destinations for canoe and kayak touring, it typically includes places like the San Juan Islands, the Baja Peninsula, the Florida Keys, the Boundary Waters, maybe the Great Lakes or the desert canyons of the American Southwest. It never includes the Mississippi River at Memphis, Tennessee. But as a result of my training routine, I know better. And I hope all people who train for canoe and kayak racing will take the opportunity to discover and appreciate the natural beauty in the places they live, regardless of whether those places get written up in glossy magazines.
There's really not that much I can tell you about these paddling sessions this time of year. I'm out there just paddling along, practicing my strokes and balance, trying to put as many miles under my boat as I can. It's all part of building the aerobic system, as I discussed in earlier posts.
At times it can seem like a grind, as though I'm just putting in the time because I have to more than because I want to. But most of the time that's not how it is. These paddles are the time I get to see the most beautiful scenes that the Mississippi River environment has to offer. After all, one of the main reasons we do this sport is to get outside and enjoy beautiful places.
Whenever some glossy travel or outdoor magazine publishes its list of the top destinations for canoe and kayak touring, it typically includes places like the San Juan Islands, the Baja Peninsula, the Florida Keys, the Boundary Waters, maybe the Great Lakes or the desert canyons of the American Southwest. It never includes the Mississippi River at Memphis, Tennessee. But as a result of my training routine, I know better. And I hope all people who train for canoe and kayak racing will take the opportunity to discover and appreciate the natural beauty in the places they live, regardless of whether those places get written up in glossy magazines.
Monday, March 12, 2012
Monday Photo Feature

Sunday, March 11, 2012
Pressing forward on a less-than-lovely day
Today I did four laps of the March strength circuit and paddled my boat for 100 minutes. The overcast skies and stiff east wind made it feel like a chilly, grey day out on the river... quite unlike yesterday, which was sunny and beautiful.
Subscribe to:
Posts (Atom)